Saturday, February 28, 2015

Gold dip-dye vase

I love this trend I see all over of paint dipped objects.   I have the perfect humdrum vase to try this technique on.  I needed a vase with some flowers to put on top of my daughter's new dresser, so off I went to Michael's to pick up some faux flowers, they have a really nice collection.

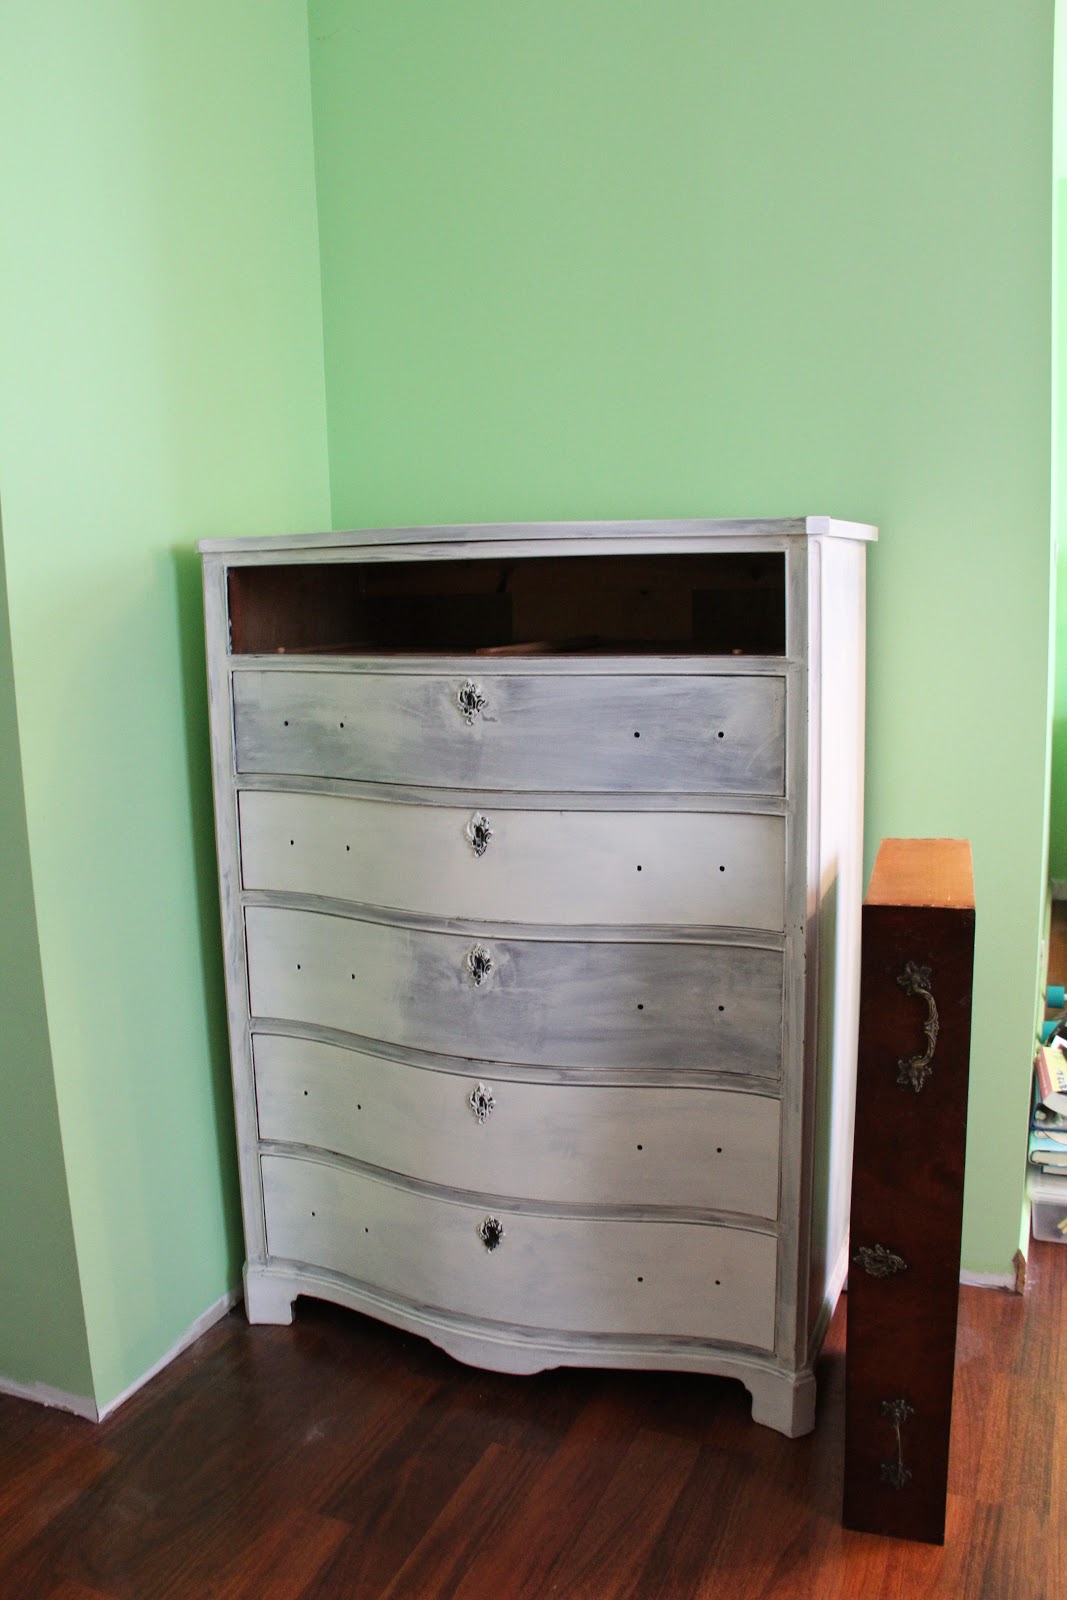
I started this easy project with my latest craze, "Rub n Buff" gold metallic wax and a plain vase.  I used it on my wrought iron base here and on the hardware for my daughter's dresser here and I love the way it looks.

First, clean the glass really well


Then, tape around the vase


Rub the gold wax where you want to make it look like it is dipped.  You can use a thin cotton cloth or your fingers.  I used my fingers, it was difficult to take the paint off, but I used some nail polish remover and it worked like a charm. 

Love the way it looks with the flowers!  So pretty!

I can't wait to show you how it looks on top of my daughter's dresser.  I will be posting the finshed dresser this week.  I hope you come back to check it out.


Thanks for stopping by!

Linking this post to:

Wednesday, February 25, 2015

DIY Ikea Rast hack

I was looking back at some of the projects I have done and noticed that I didn't share a how-to post on my Ikea Rast side table.  I think it's because there are so many of these hacks around, I didn't want to be redundant.  Nevertheless,  I figured I'll just put it out there to show what I did with the Rast.  I really like the way it turned out and it is so inexpensive.  


I heard Ikea furniture is notorious for having hundreds of pieces and is difficult to assemble.  So, I coerced my husband to put the two side tables together.  To his surprise it was pretty easy, alleluia!  I would've never heard the end of it if it was difficult!


I stained the exterior except for the drawers with espresso stain to match the other furniture in my bedroom.  


Then, I painted the drawer fronts with oil based high gloss paint.  Oil base paint gave it the smooth lacquer looking finish that I wanted.


I had ordered brass pulls from d.lawless hardware, they had really good prices and a nice selection. 


I really like the way it looks in my bedroom.  Have you done any Ikea hacks lately?  I would love to see it!

Thanks for stopping by!

Linking this party to:

Friday, February 6, 2015

Sneak peek at my daughter's dresser

Hi all! I can't believe it's Friday already, time is flying by.  I have been planning and tackling a few projects in my house since I've been stuck in the house due to "snowpocalypse".

I want to show you the progress on my daughter's dresser, it is nearing the end and I am really pleased at the way it is taking shape.

Remember how it looked before...  The wood veneer on the dresser was peeling off and missing in places.  A little bit of sanding, scraping off the peeling veneer and a fresh coat of paint really revived this dresser.  To add a little more interest I painted geometric design to the front of the drawer.

I wanted to change the drawer pulls to give the dresser bit of an updated look.  Even though, I like the the original brass pulls they were tarnished and looked old,  just didn't work well with the fresh new look.    I picked up drawer pulls from Home Depot which I really liked and it matched the design well, but to use them I would have to fill in holes from the old pulls and paint.  That's a lot of work I don't have the attention span or the patience for!


Then, I decided to use some gold rub n buff (my favorite new wax) on the old pulls, because I didn't want to spend the time removing the tarnish, call me lazy this was much easier and so nice!


I put the old pulls on the drawer and my daughter and I like it much better now in it's new state.

I outlined the geometric pattern with a thin line of burnt umber color paint to give it an effect of a shadow.  It made the design pop and made it much more interesting.


Well, that is about all I can show you for now... I will be finished in a few days and I can't wait to show you the results!

Thanks for stopping by!

Sherry


Linking this post to:
Fridays Unfolded

Sunday, February 1, 2015

Super Bowl Sunday and a home for my shell mirror

I hope everyone have a fun Super bowl Sunday. We will be with a group of friends at a Super bowl party, we do this every year and it's lots of fun!  It has been so called here in New York that I have not gone out of my house unless it was absolutely necessary.  I really don't like the cold weather!  Since I am stuck inside,  I have been finishing up some loose ends around my house.  I am still working on my daughter's dresser, hope to be finished in a few days.

Meanwhile, one of the things I love to do is make seashell mirrors... I am always on the beach searching for seashell treasures when the weather permits of course,  so I can incorporate them in my mirrors and my shell projects, it is one of my favorite pastimes.  I made this shell mirror using some of my gathered shells from our beach and store bought shells.  


I start off with 24" X 24"X1/2" piece of plywood, then paint the board white and glue on black felt for the back, I also add hangers on the back to hang before I start gluing the shells on the board.  I recommend using mirror adhesive to attach the mirror on to the board, I wouldn't be comfortable using any other type of glue to attach the mirror.  


Placing each unique shell on the right spot to create the mirror is really a fun, creative process.


And here it is, encrusted with beautiful shells, I love it!  I'm not the only one who loved it, my mother came over and also fell in love with it.  My mother's birthday was coming up and the mirror found its way into her house.  She placed it over a mirrored console table I had bought for her from Kirkland's and this little area in her home is now named "Sherry's corner".  


Doesn't it look so pretty?  These pictures are not the best, it looks fantastic in person!

Have a great day!

Sherry

Linking this post to:

Tuesday, January 27, 2015

Snowed in by Winter storm Juno


Hi everyone! My friend Sheryl shared this picture she took this morning enjoying her day off from work in front of her fireplace in her Pjs.  If you are on the east coast, we are probably in the same boat, snowed in by Winter storm Juno.  They were anticipating 2-3 feet of snow and declared a state of emergency.  However, we didn't get nearly as much snow as they predicted, thank goodness!  Just enough to get a snow day from work and school,  whoo hoo!!  

I needed to move things around a bit to get some change in my dining room, I don't like to see the same accessories in one area for too long.   So, I  restyled my buffet and my shelves with some Home Goods finds.


 Keeping my fingers crossed for my Orchids to bloom again.

I still need to add more accessories to my book shelf,  maybe some books, uhm interesting thought!


Here's my shell box, I have been in the process of making for the past few months, another one of those procrastinating projects.  

I found this painted nautilus shell in a antique store in Upstate, love it!

 Hope you are having a wonderful day, snowed in or not!

Thanks for stopping by!

Sherry


Linking this post to:


Tuesday, January 20, 2015

Bringing new life to an old dresser with hand painted stencil - Part 1

Hi all! Hope you had a wonderful weekend!  My friend gave me a dresser that once belonged to his mother,  he didn't have a place for it and he didn't want to throw it out for sentimental reasons.  Perfect timing, I needed to find a dresser for my daughter's room, she has one dresser that is always a mess and overflowing with clothes.  Since she discovered the joy of shopping for clothes, there is not enough storage for little obsession.

The new/old dresser will work perfectly, except it needed some TLC and needed to be painted to make it flow with the rest of the furniture. 

Here is the TLC part...  Top drawer needed to be secured with some glue and nails.  


The veneer was chipping off, so I removed the veneer and sanded it down.

Lost a little detail in the process, but it's ok!


As I was working on it, the whole veneer on one of the drawers popped off.  Easy fix, just put some wood glue and clamped it, was good as new!


Dresser got slightly sanded and primed...

And painted it green to match the room.


Now, for the hard part!  I wanted to stencil the drawer fronts with a geometric pattern, except I didn't want a very common pattern.  I decided to make my own stencil, must warn you, it is time consuming and a bit frustrating.  However,  I think I will be happy with the end results.  

After drawing numerous failed patterns, I settled on one.  I am sure, better yet, I can almost guarantee that there is a better way to make a stencil.  But, this is the way impatient me figured it out!  

First, I folded a piece of paper in to four quarters and draw quarter of the pattern.  As if you were going to cut out snow flakes.


 Unfold the paper and it will look like this... Love this pattern!  Then, I placed it on a craft foam paper and glue it on for a bit of thickness.  

I cut out the pattern.  Of course, it would've been easier if I cut it out used the stencil method.  But, I never make things too easy on myself, it always has to have an extra step and more time consuming.  I wanted it more hand painted look so that is why opted to go this way.


Once foam paper was cut out, I placed the stencil on the drawer and traced the design.  


Sorry, little difficult to see...

Painting the stencil with off white paint.


I may add a little more of interest to this, I'll see.  

I'll be finished with this dresser soon, I hope you come back to see the end result! 

What do you think?  Is it okay so far?  Would love some input.

Have a great day!

Sherry


Linking this post to:


Sunday, January 18, 2015

Going for the gold!

I'm in love with gold accents... I see them everywhere and I love the way it is used, not in a garish way but a very elegant, sophisticated way!  I used to make fun of my friend because she loved gold... Gold, gold everywhere! We used to laugh, if she could dip her children in gold she would!  Now here we are, I am loving gold, not as much as to dip my children in gold but simple gold accents sometimes with mixture of silver or chrome.  Of course, I still do believe gold should be used in moderation but


Style me pretty


How about you?  Do you use gold accents in your decor?

Hope you are having a wonderful weekend!

Sherry

Content.ad - Widget 1

LinkWithin

Related Posts Plugin for WordPress, Blogger...